How to Combine a Flashlight and Firearm for Self-Defense
Imagine being in a low light environment where every shadow feels like a potential danger. A flashlight becomes more than just a source of light—it’s a personal defense tool that can save your life. Modern flashlights are incredibly powerful, often up to 100 times brighter than older models. This brightness can disorient attackers, forcing them to look away or retreat.
Combining a flashlight with a firearm takes your self-defense strategy to the next level. It improves visibility, helps you identify threats, and creates unpredictability, making it harder for attackers to anticipate your actions. Whether you’re scanning a room or navigating a dark alley, mastering flashlight techniques boosts your confidence and decision-making under pressure.
In self-defense, proper illumination isn’t just helpful—it’s essential. It sharpens your situational awareness and ensures you can act swiftly and safely when it matters most.
Key Takeaways
A flashlight helps you see better in dark places. It lets you notice dangers early before they become serious.
Using a strong flashlight with your gun helps you see clearly. It makes sure you can tell the difference between danger and safety.
Learn and practice flashlight methods, like Harries and FBI styles. This will help you stay calm and act better in tough moments.
Be careful when using a flashlight. If used wrong, it can show where you are. Use quick flashes of light to stay hidden.
Pick a tough, bright flashlight that works for you. Practice often with it to feel ready and comfortable.
Why Use a Flashlight with a Firearm?
Enhancing Situational Awareness
When you're in a low-light environment, your ability to see clearly can make all the difference. A flashlight improves your situational awareness by illuminating your surroundings and helping you spot potential threats before they escalate. Using a tactical light allows you to sweep an area with precision, ensuring no corner goes unchecked. This technique, often called "search and assess," gives you a better understanding of your environment and helps you stay one step ahead in a tactical situation.
Pairing a flashlight with verbal commands can also enhance your control over a situation. For example, shining a light on a potential threat while issuing a firm warning can deter aggressive behavior. The psychological impact of a bright beam in someone's eyes shouldn't be underestimated—it can make them think twice about their actions. In personal defense, staying aware of your surroundings is key, and a tactical flashlight is one of the best tools to help you do that.
Improving Target Identification
In self-defense, identifying your target is critical. A flashlight ensures you can distinguish between a threat and an innocent bystander. This clarity is especially important in low-light conditions, where shadows can play tricks on your eyes. Tactical lights are designed to provide clear visibility, allowing you to assess situations accurately and make informed decisions.
Using a tactical light effectively involves scanning your surroundings with short bursts of light. This method minimizes the risk of detection while still giving you enough visibility to locate potential threats. A bright flashlight can also neutralize an attacker's advantage of hiding in the dark. By illuminating your target, you gain the upper hand and reduce the chances of making a costly mistake.
Advantages of Using a Tactical Flashlight
A tactical flashlight offers more than just illumination. Its brightness can temporarily blind or disorient an attacker, giving you precious seconds to act. Many tactical lights also come with strobe settings, which can confuse and overwhelm a threat. These features make them invaluable in a tactical situation.
The sturdy build of a tactical flashlight adds another layer of utility. Some models have serrated bezels, which can be used as an improvised weapon if needed. Additionally, tactical lights often have multiple brightness levels, allowing you to adapt to different scenarios. Whether you're navigating a dark alley or defending yourself at home, a tactical flashlight is a versatile tool that enhances your personal defense strategy.
Risks of Improper Flashlight Use
Using a flashlight with a firearm can be a game-changer, but improper use can create serious risks. If you’re not careful, you might unintentionally give away your position. A flashlight beam is like a beacon in the dark, and an attacker could use it to locate you. This is especially dangerous if you’re in a situation where stealth is critical.
Another common mistake is keeping the light on for too long. While it’s tempting to flood the area with light, this can make you an easy target. Instead, use short bursts of light to scan your surroundings. This technique not only helps you stay hidden but also conserves battery life. Running out of power at the wrong moment could leave you vulnerable.
Holding the flashlight incorrectly can also lead to problems. If your grip isn’t secure, you might drop it during a high-stress situation. Worse, fumbling with the flashlight could distract you from the threat at hand. Practicing proper techniques, like room clearing with a flashlight, can help you avoid these issues.
Lastly, over-reliance on the flashlight can be risky. While it’s a powerful tool, it’s not a substitute for good judgment and situational awareness. You should always have a backup plan in case the flashlight fails or the situation changes unexpectedly.
Tip: Practice using your flashlight in different scenarios. This will help you build confidence and reduce the chances of making mistakes when it matters most.
By understanding these risks and preparing for them, you can use your flashlight effectively without compromising your safety.
Flashlight Techniques for Self-Defense
Harries Technique
Description and Steps
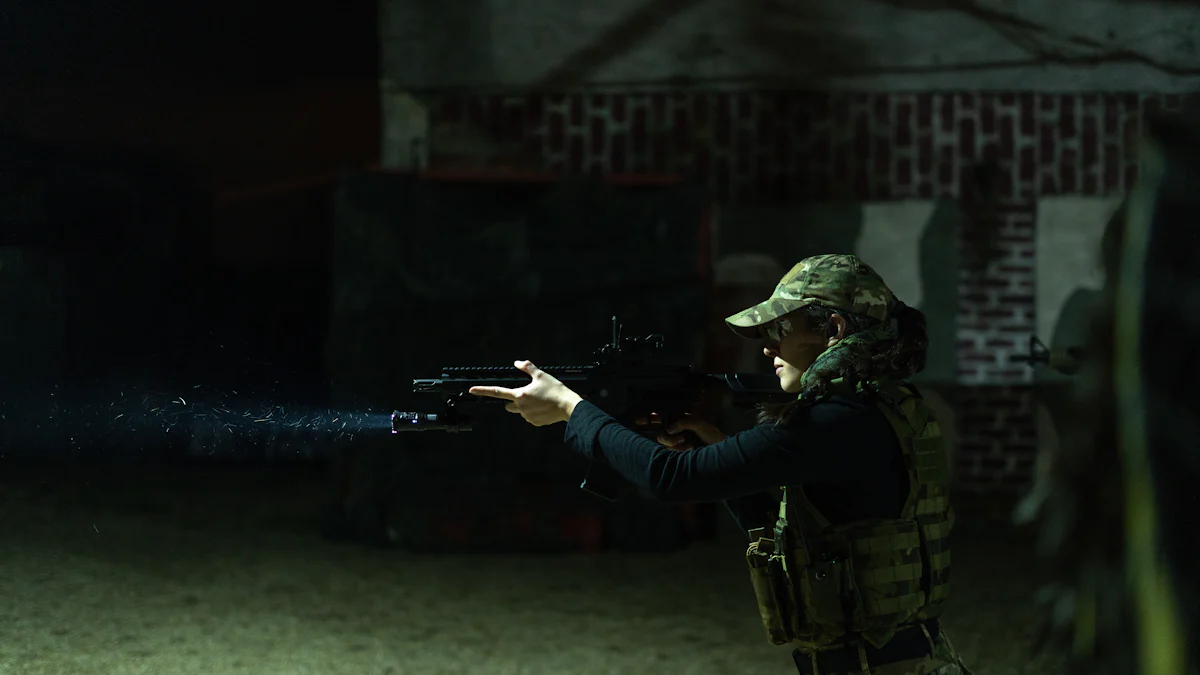
The Harries technique is one of the most popular flashlight-gun techniques for self-defense. It involves holding the flashlight in an icepick grip (with the thumb near the light's switch) and pressing the back of your support hand against your gun hand. This creates a stable platform for aiming and shooting.
Here’s how you can use it:
Hold the flashlight in your non-dominant hand using an icepick grip.
Extend your firearm with your dominant hand.
Bring the flashlight underneath the gun, pressing the backs of your hands together.
Align the flashlight beam with your firearm to illuminate your target.
Advantages and Disadvantages
Advantages:
Provides excellent stability when aiming.
Keeps the flashlight and firearm aligned, ensuring accuracy.
Works well with the Weaver shooting stance.
Disadvantages:
Can feel uncomfortable in a squared-up stance.
May cause fatigue during extended use.
Not ideal for close-quarters combat, as an attacker could grab your arm.
FBI Technique
Description and Steps
The FBI technique is a classic method that keeps the flashlight away from your body, reducing the risk of making yourself a target. You hold the flashlight in your non-dominant hand and extend your arm away from your torso. This technique allows you to scan your surroundings while keeping your body less exposed.
Steps to follow:
Grip the flashlight in your non-dominant hand.
Extend your arm outward, away from your body.
Use short bursts of light to scan the area.
Keep your firearm ready in your dominant hand for quick action.
Advantages and Disadvantages
Advantages | Disadvantages |
|---|---|
Keeps the light source away from your body, reducing the risk of being hit. | Can be tiring over time, especially during prolonged searches. |
Offers flexibility in movement and searching. | Requires one-handed shooting, which can be challenging at longer distances. |
Aligns the light with the gun and target, illuminating the gun's sights. | Vulnerable in close quarters, as the extended arm can be grabbed or struck. |
Temporarily blinds an adversary, hindering their ability to see you. | Telegraphs movement around corners due to the flashlight beam's position. |
Neck Index Technique
Description and Steps
The neck index technique is a simple yet effective method for low-light self-defense. You hold the flashlight close to your neck, using your jawline as a reference point. This keeps the light aligned with your line of sight and allows you to illuminate both your target and your gun sights.
Steps to execute:
Grip the flashlight in your non-dominant hand.
Place the flashlight near your neck, using your jawline as a guide.
Keep the light aligned with your head’s direction to illuminate your target.
Use your dominant hand to aim and shoot if necessary.
Advantages and Disadvantages
Advantages:
Keeps the flashlight close to your body, improving control.
Illuminates both your target and gun sights for better accuracy.
Useful in tight spaces, where the flashlight can double as an impact weapon.
Supports one-handed shooting, making it easier to maneuver.
Disadvantages:
Limits your ability to use the flashlight for scanning wide areas.
May expose your head to potential strikes in close-quarters situations.
Tip: Practice these tactical flashlight techniques regularly to build muscle memory and confidence. Each method has its strengths, so choose the one that suits your environment and comfort level.
Syringe Grip Technique
Description and Steps
The syringe grip technique is a practical and comfortable way to hold a flashlight during self-defense. It involves gripping the flashlight as if you’re holding a syringe, with your thumb or fingers operating the switch. This method works best with flashlights designed for tactical use, especially those with tail-cap switches.
Here’s how to execute it:
Hold the flashlight in your non-dominant hand, gripping it like a syringe.
Position your thumb or index finger near the tail-cap switch for easy activation.
Align the flashlight with your firearm, keeping both hands close together.
Use your dominant hand to aim and fire while maintaining control of the light.
Advantages and Disadvantages
Advantages:
Provides a natural and intuitive grip, reducing strain on your wrist.
Feels similar to aiming a pistol, making it easy to adapt in high-stress situations.
Enhances efficiency by allowing consistent operation with your firearm.
Disadvantages:
Requires a flashlight with a specific design, such as a tail-cap switch.
May not work well with larger or heavier flashlights.
Limits your ability to scan wide areas quickly.
Tip: Practice this technique with your flashlight and firearm to build muscle memory. Familiarity will help you react faster when it counts.
Rogers Technique
Description and Steps
The Rogers technique is a highly effective method for combining a flashlight and firearm. It involves using a flashlight equipped with a combat ring, allowing you to maintain a secure grip on both tools. This technique is ideal for situations where quick transitions between illuminating and engaging a threat are critical.
Steps to follow:
Use a flashlight with a combat ring for better grip and control.
Hold the flashlight in your non-dominant hand, placing the combat ring between your fingers.
Grip your firearm with both hands, keeping the flashlight aligned with your gun.
Activate the flashlight using your thumb or fingers while maintaining a firm grip.
Advantages and Disadvantages
Advantages | Disadvantages |
|---|---|
Provides a secure grip on both the flashlight and firearm. | Requires a specific type of flashlight with a combat ring. |
Facilitates quick transitions between scanning and engaging a threat. | May feel awkward for beginners without proper practice. |
Enhances control and accuracy during high-stress situations. | Can be challenging to use with gloves or in wet conditions. |
Note: The Rogers technique works best with flashlights designed for tactical use. Investing in the right equipment can significantly improve your performance.
Training to Shoot While Holding a Flashlight
Importance of Regular Practice
Mastering low-light shooting requires consistent practice. You can’t expect to react effectively in a high-stress situation without building muscle memory first. Regular training helps you improve essential skills like target identification and situational awareness. It also sharpens your reaction time, which can make all the difference when seconds count.
Tip: Practice activating your flashlight while drawing your firearm. This simple drill boosts your coordination and ensures you’re ready to act quickly.
To get the most out of your training, focus on real-world scenarios. For example:
Simulate situations where you need to identify a target in the dark.
Practice switching between flashlight techniques to adapt to different environments.
Work on maintaining control of both your firearm and flashlight under pressure.
The more you train, the more confident and prepared you’ll feel during low-light engagement.
Drills for Low-Light Scenarios
Training for low-light shooting isn’t just about hitting a target. It’s about learning to manage your flashlight effectively while staying safe. Here are some drills to include in your routine:
Flashlight activation practice: Draw your firearm and flashlight simultaneously. This improves your reaction time and coordination.
Shooting from cover: Practice moving behind cover while engaging a target. This reinforces the habit of using your surroundings for protection.
Light management drills: Use your flashlight intermittently to scan your environment. This reduces the risk of giving away your position.
Note: Always prioritize safety during these drills. Use a safe training environment and ensure your firearm is unloaded.
These exercises will help you develop the skills needed for effective low-light engagement.
Transitioning Between Flashlight Techniques
Switching between flashlight techniques during a scenario can feel tricky at first. But with practice, you’ll learn to adapt seamlessly. Start by focusing on the basics:
Use the Harries technique for stability when aiming.
Practice short bursts of light to identify targets without exposing your position.
Combine flashlight activation with drawing your firearm to improve your coordination.
As you advance, incorporate movement into your training. Practice acquiring targets while transitioning between techniques like the neck index and syringe grip. Experiment with momentary and constant-on lighting to see what works best for you.
Tip: Repetition is key. The more you practice, the more natural these transitions will feel.
By mastering these transitions, you’ll be better prepared for any low-light shooting scenario.
Safety Tips for Training
When training to shoot while holding a flashlight, safety should always come first. Practicing in low-light conditions can be tricky, but following a few key tips will help you stay safe and build confidence.
Keep your tools aligned: Make sure your flashlight doesn’t block your firearm or vice versa. This ensures you can aim accurately and maintain control over both tools.
Focus on stability: Use techniques like the Harries method to stabilize your shooting hand. Pressing the flashlight against your wrist creates a solid platform for aiming.
Control the light: Avoid keeping the flashlight on continuously. Instead, use short bursts of light to scan your surroundings. This reduces the chance of giving away your position.
Tip: Practice turning the light on and off while moving. This helps you stay unpredictable and harder to target.
Rely on muscle memory: Repetition is your best friend. Train regularly to build muscle memory so you can react instinctively in high-stress situations.
Stay aware of your surroundings: Low-light scenarios can feel disorienting. Always scan the area for potential threats before moving or engaging.
Note: Stability and light control are just as important as accuracy. Take your time to master these skills during practice.
Simulate real scenarios: Practice moving between positions while alternating between light on and light off. This mimics real-world situations and prepares you for unexpected challenges.
Prioritize safety gear: Use protective equipment like eye and ear protection during training. Even in practice, safety should never be compromised.
By following these tips, you’ll not only improve your technique but also ensure your training sessions are as safe as possible. Remember, preparation is key to handling real-life situations with confidence.
Choosing the Right Tactical Flashlight and Firearm Setup
Key Features of a Tactical Flashlight
Brightness and Beam Type
When choosing a tactical flashlight, brightness is one of the most critical factors. A flashlight with higher lumens, such as a 1000-lumen model, can temporarily blind an attacker, giving you a crucial moment to act. The beam type also plays a big role. A focused beam works well for disorienting threats, while a broader beam helps you stay aware of your surroundings. Practicing in low-light conditions can help you understand how different beam types perform in real scenarios.
You’ll also want to think about lighting modes. Momentary lighting lets you quickly assess a situation without revealing your position, while constant-on lighting is better for extended engagements. Balancing these features ensures you’re prepared for any situation.
Durability and Size
A high-quality tactical light should be tough enough to handle drops, impacts, and harsh conditions. Look for models made from materials like anodized aluminum. Water resistance is another must-have. A flashlight with an IPX7 or IPX8 rating can handle rain or even submersion, making it reliable in emergencies.
Size and weight matter too. A compact flashlight is easier to carry and use, especially in high-stress situations. You don’t want something too bulky that slows you down.
Firearm Compatibility with Tactical Lights
Mounting Options
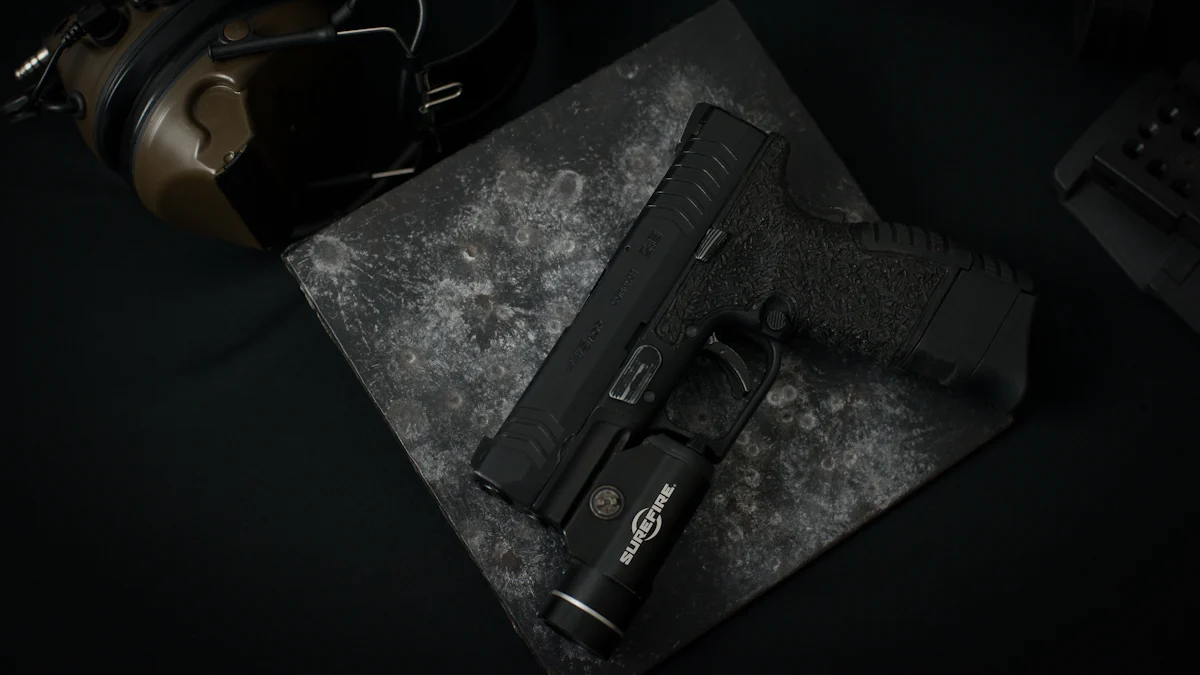
If you’re considering a weaponlight, make sure it’s compatible with your firearm. Some tactical flashlights can mount directly onto your gun, providing hands-free illumination. This setup is great for maintaining a two-handed grip, which improves accuracy. However, ensure your holster works with both the firearm and the mounted light. This compatibility is key for quick draws and smooth operation.
Ergonomics and Handling
The way your tactical flashlight feels in your hand can make a big difference. A flashlight with a combat ring or ergonomic design allows for better control and quicker transitions between techniques. If you’re using a weaponlight, make sure it doesn’t interfere with your firearm’s balance or handling. The goal is to enhance your performance, not hinder it.
Budget-Friendly Options
You don’t have to break the bank to get a reliable tactical flashlight. Options like the ThruNite BSS V5 offer impressive features for under $70, including 2,700 lumens, an aluminum body, and an IPX8 rating. Another great choice is the MecArmy SPX10, which provides 1,100 lumens and a unique 360-degree tail switch design. Both models are durable, effective, and affordable, making them excellent choices for pairing with your home-defense firearm.
Tip: Always test your flashlight and firearm setup before relying on it. This ensures everything works smoothly when it matters most.
Recommended Tactical Flashlight and Firearm Pairings
Choosing the right flashlight and firearm pairing can make a huge difference in your self-defense setup. The right combination ensures you’re prepared for any low-light scenario. Here are some top recommendations to consider:
SureFire Flashlights: SureFire is a trusted name in tactical lighting. Their products are known for their exceptional quality and durability. Pair a SureFire X300 Ultra with a Glock 19 for a reliable and versatile setup. The X300 Ultra’s 1,000-lumen output provides powerful illumination, while its rugged design ensures it can handle tough conditions. This pairing works well for both home defense and concealed carry.
Streamlight Tactical Lights: Streamlight offers affordable yet high-performing options. The Streamlight TLR-1 HL is a great choice for pairing with a Smith & Wesson M&P Shield. This light delivers 1,000 lumens and features an easy-to-use ambidextrous switch. It’s perfect for those looking for a budget-friendly option without sacrificing quality.
Insight Technology Lights: Insight Technology brings military-grade expertise to their products. The Insight M3 Tactical Illuminator pairs beautifully with a Sig Sauer P226. This combination provides excellent balance and performance. The M3’s compact design and bright beam make it ideal for quick target identification.
When selecting your pairing, think about your specific needs. Are you looking for something compact for concealed carry? Or do you need a setup for home defense? Testing your flashlight and firearm together is key. You’ll want to ensure they feel comfortable and work seamlessly as a unit.
Tip: Always practice with your chosen setup. Familiarity with your tools builds confidence and ensures you’re ready to act when it matters most.
Combining a flashlight with a firearm is a game-changer for self-defense. It helps you identify threats, disorient attackers, and stay in control during a self-defense scenario. Techniques like the Harries or FBI method give you options to adapt to different situations. Regular practice ensures you’re confident using a gun and flashlight together. Choosing the right tools for personal defense is just as important. Prepare for low-light scenarios by training consistently and testing your setup. When you’re ready, you’ll feel more secure and capable of handling any challenge.
FAQ
What’s the best flashlight technique for beginners?
The Harries technique is a great starting point. It’s simple and provides stability when aiming. You hold the flashlight under your firearm, pressing your hands together. This keeps the light aligned with your target and helps you focus on accuracy.
Can I use any flashlight for self-defense?
Not all flashlights work well for self-defense. A tactical flashlight with high lumens (at least 500) and a durable build is ideal. Look for features like a strobe mode and a compact size for easy handling.
How often should I practice flashlight techniques?
You should practice regularly, at least once a month. Consistent training builds muscle memory and boosts confidence. Focus on drills that simulate real-life scenarios, like moving in low light or switching between techniques.
Are weapon-mounted lights better than handheld flashlights?
Weapon-mounted lights offer hands-free convenience and better control. However, handheld flashlights give you flexibility and can be used independently. Choose based on your needs, but always test your setup to ensure it feels comfortable.
What’s the most common mistake when using a flashlight with a firearm?
Keeping the light on too long is a common mistake. It can give away your position. Use short bursts of light to scan your surroundings. This keeps you hidden while still allowing you to identify threats.
Tip: Practice turning your flashlight on and off quickly to stay unpredictable.
See Also
Comparing Police Flashlights And Standard Flashlights: A Guide
Defining What A Tactical Flashlight Truly Means
Selecting The Perfect High-Power Flashlight For Your Needs
